Create a Worldbuilding Timeline
You’re the creator, and this is your canvas. Use the Worldbuilding Template to lay down the lore and craft a timeline of past, present, and future events.

About the Worldbuilding Template
The worldbuilding template is the perfect place for authors, screenwriters, filmmakers, and game developers to get down all the details needed to bring a story world to life.
Use it to document the history of cities, cultures, and character lifespans and understand where your story fits in the world around it.
In this example, we’re building a fantasy world with various characters, locations, and events. We’ll do most of the work in the Timeline view, using the side panel to create items and adding extra details in the Inspector. We’ll also cover how to customize the item types, icons, colors, and date and time settings to make the template your own.
If you are new to Aeon Timeline and unfamiliar with anything covered in this guide, check out our Quickstart Guide for a walkthrough of the interface and common functions.
Characters & Groups
The Characters Panel is your go-to for capturing everything about your characters—from their lifespans and motivations to physical traits and the groups they’re part of.
Start by listing the names or working titles of your characters, then use the Inspector to add any extra helpful details.
Character Creation
- Click theCharactericon in the sidebar to open the Characters panel.
- Click New Character to create and name characters.

Character Details
- Select a character to open the Inspector.
- Use theDatespanel to show when they lived, or set it to ongoing if they’re still alive.
- Add tags or write a character summary in thePropertiespanel.

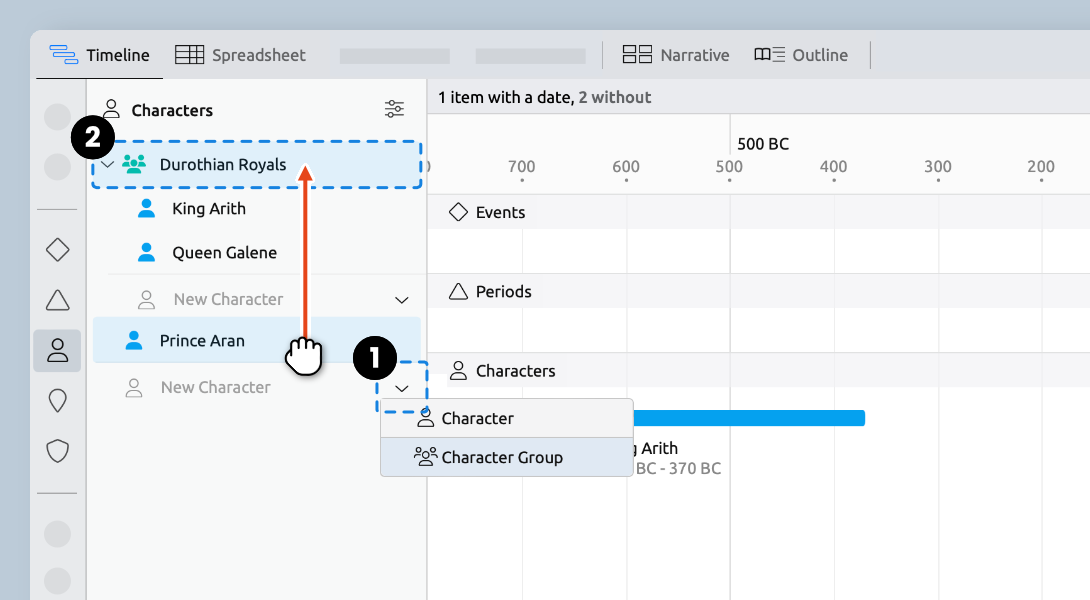
Character Groups
- Click thearrowin the New Character row. SelectCharacterGroup from the dropdown menu to create and name a new group.
- Add characters to a group by dragging them in.
- Select a group to write summary info or more detailed notes in the Inspector.
Locations & Sub-locations
A location could be anything from an entire planet to your protagonist's favorite bar. With Aeon Timeline, you can track the location of every event, making it easy to recall all the details when you’re ready to write.
Nesting locations lets you show how places fit within each other, helping you create a richer, more detailed world.
Location Creation
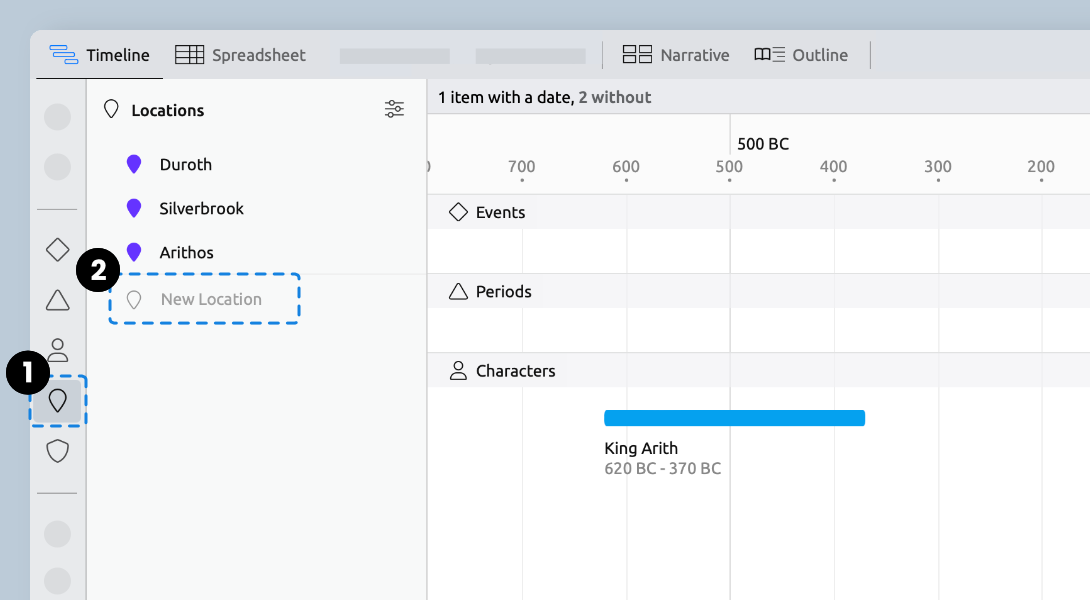
- Click theLocationsicon in the sidebar to open the Locations panel.
- Click New Location to create and name a location.
Location Details
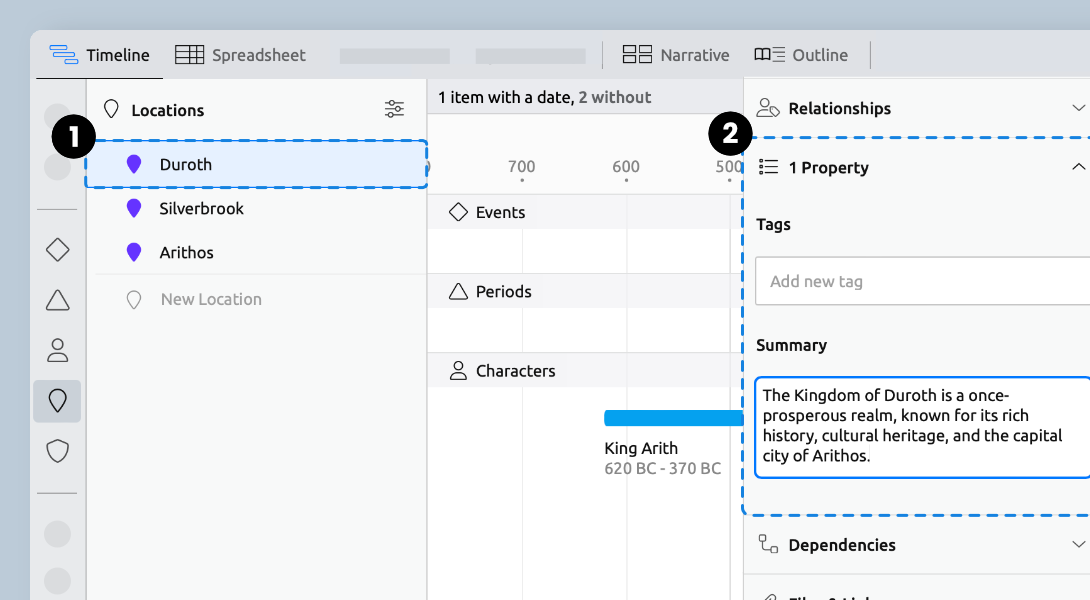
- Select a location to open the Inspector.
- Use thePropertiespanel to write a summary, detailed notes, or add tags to help with categorization.
Nesting Locations
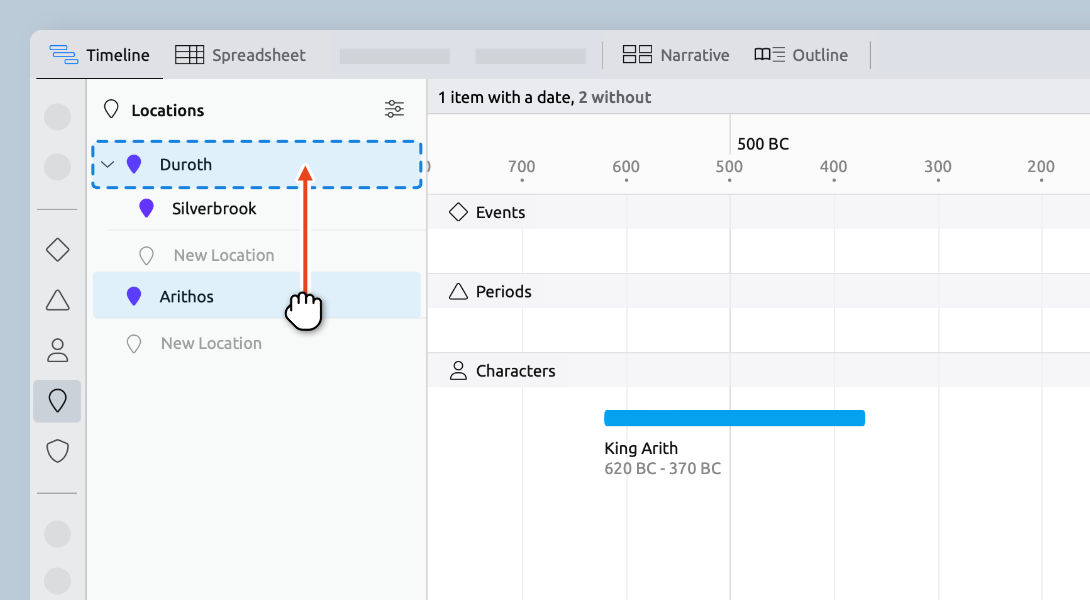
- Drag a location onto another to show that it belongs inside, like a district within a city.
- Continue nesting locations to build a more detailed picture of the places in the world.
Events & Sub-events
An event can be almost anything: a birth, a death, a marriage, a scientific breakthrough, a tragic loss, or a cultural shift. Basically, any moment that adds depth or context to your story.
Just like nested locations help you build the look and feel of your story world, nested events help you organize your timeline and create detailed, step-by-step accounts of larger events.
Event Creation
- In the Timeline view, click theEventsicon to open the panel and select New Event.
- Click and drag an event from the list to place it. Drag thearrowsto adjust the duration.
- Alternatively, double-click a blank space on the timeline to create a new event at that point.

Event Details
- Select an event to open the Inspector.
- Use theDatespanel to set a precise date or duration.
- Use thePropertiespanel to add a summary or detailed notes about the event.

Nesting Events
- Drag an event onto another event in theEventspanel to show that it’s a smaller piece within a larger whole.
- Continue nesting events to create a blow-by-blow account of complex events.
Undated events are not visible on the timeline, but can be viewed in the Events panel or the spreadsheet.
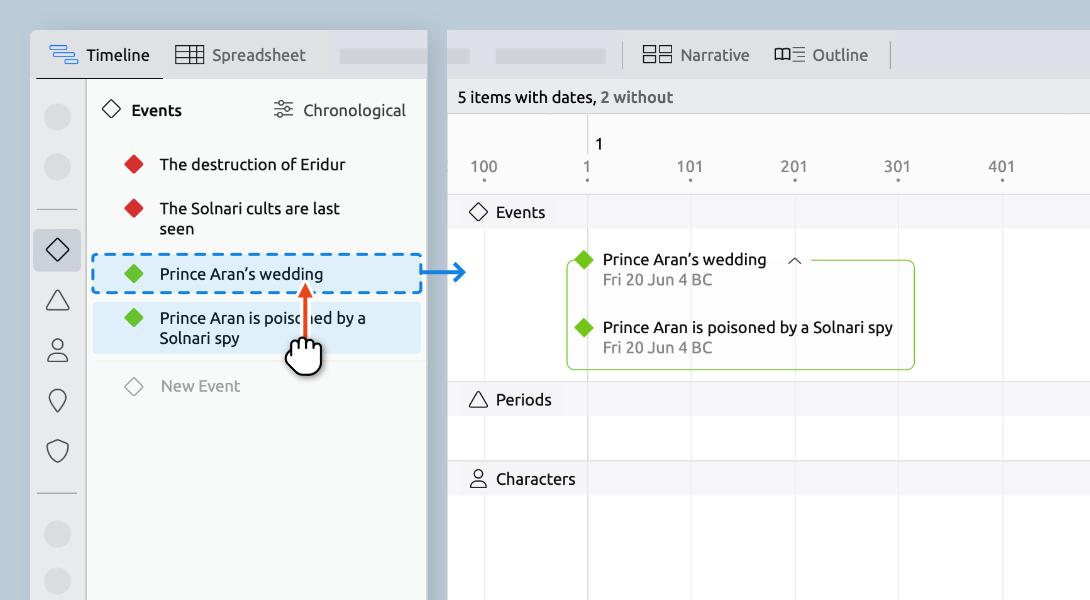
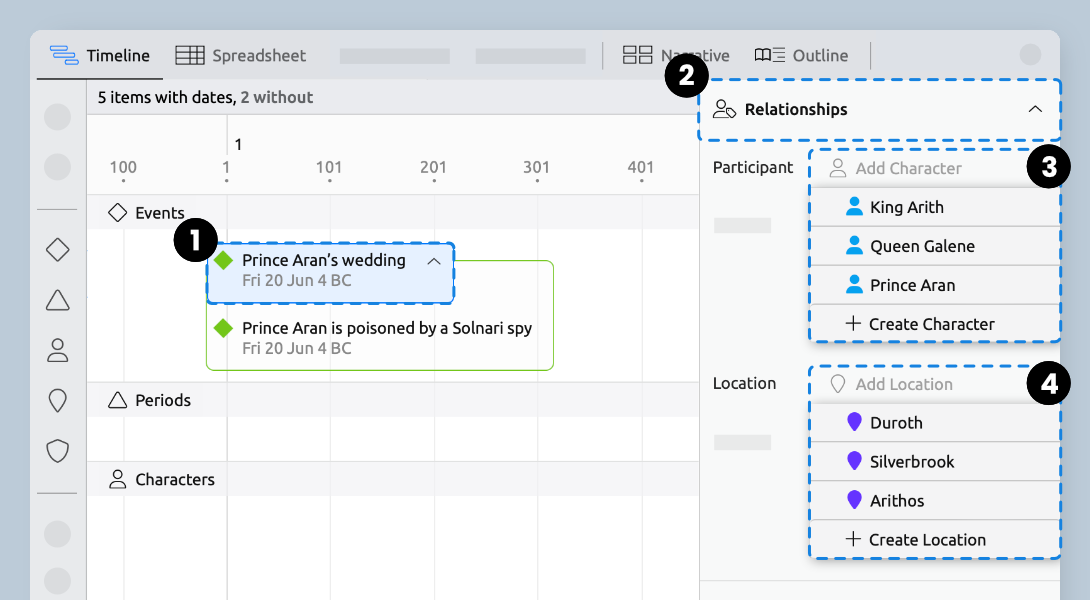
Linking Items
Linking events to characters and locations helps you capture details like where someone was born, where something happened, and who was involved. Creating these connections gives you the power to group items and view your timeline in new ways.
Assigning Characters and Locations to an Event
- Select an event in the Timeline view or theEventspanel to open the Inspector.
- Open theRelationshipspanel in the Inspector.
- Click Add Character to link the event to an existing character, or select Create Character to link it to something new.
- Click Add Location to link the event to an existing location, or select Create Location to link it to something new.
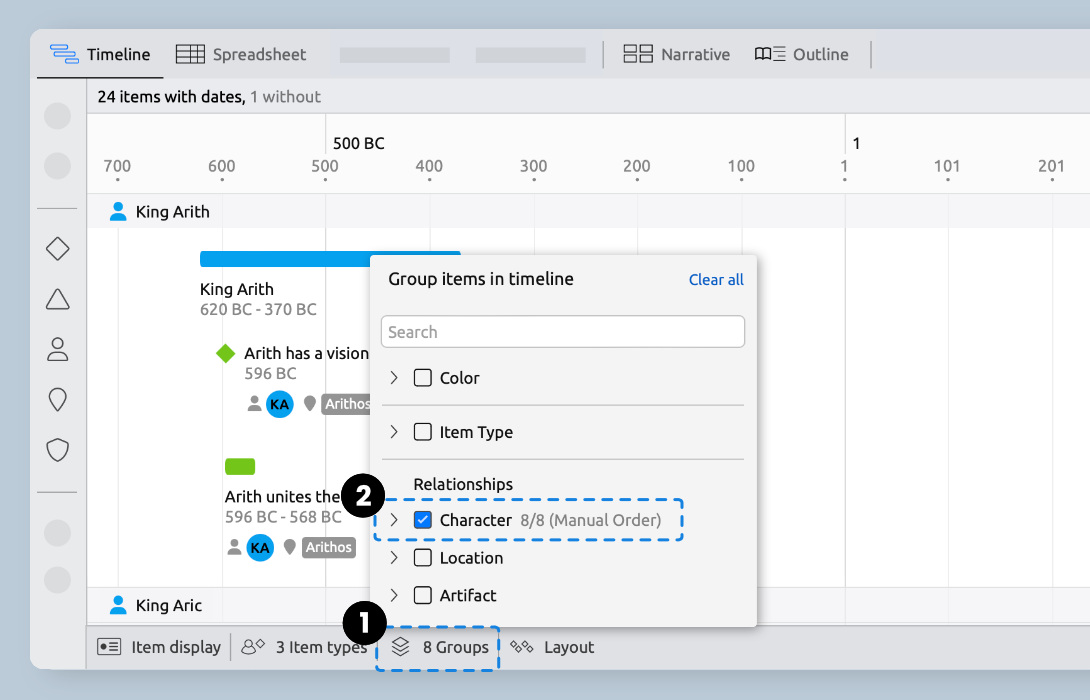
Timeline Groups
- Click theGroupbutton in the footer to open the Groups panel.
- Select the checkboxes next an item type to activate grouping.
- Deselect any unwanted groups to refine what’s shown on the timeline.
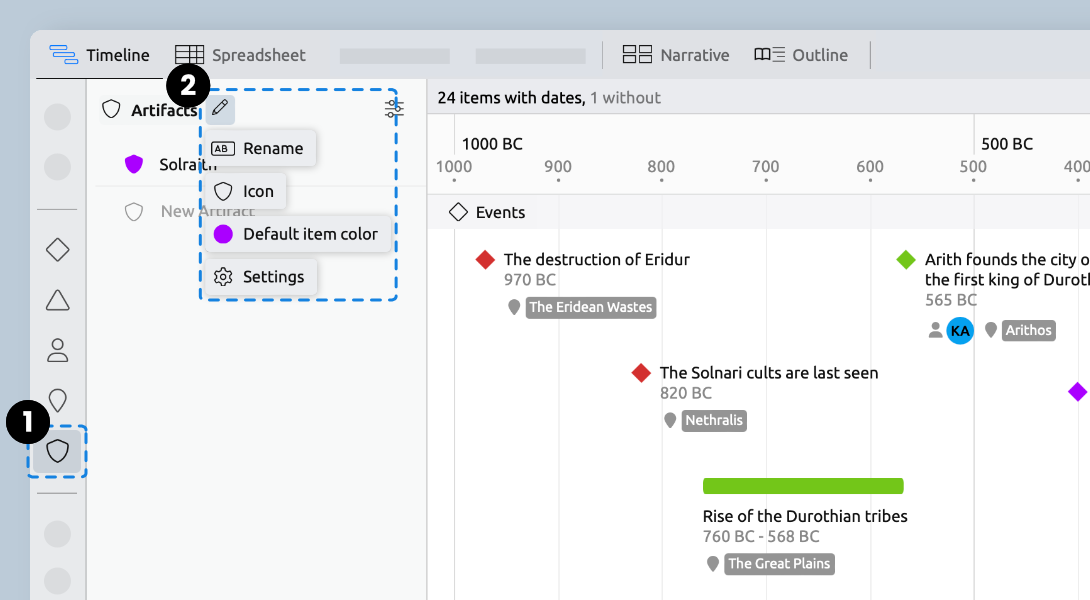
Customizing the Template
The Worldbuilding template has default item types suited for a fantasy setting. But you can easily customize the names, colors, and icons to fit the unique world you’re building.
You can also fine-tune the date and time settings to adjust the format, precision, or current day. If you're after something truly unique, you can even create a fully custom calendar when starting a new timeline.
Customizing Item Types
- Select an item type in the sidebar to open its panel.
- Hover over the panel title. Click thepencilicon to change the icon or edit the label.
- SelectSettingsto change the sidebar order or access advanced settings.
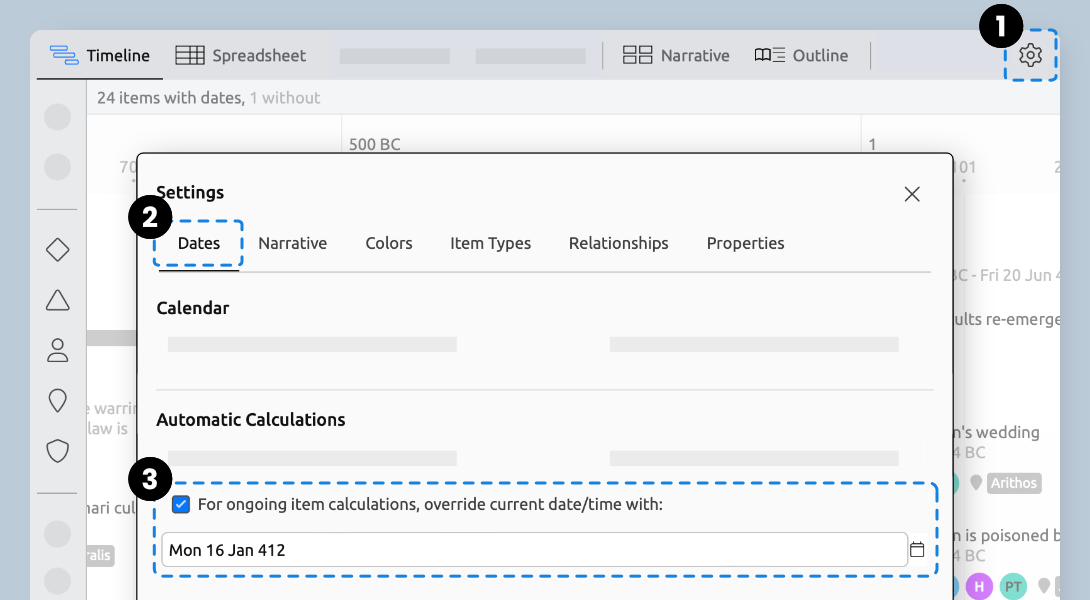
Setting the Current Day
- Click theSettingsicon to open the Settings window.
- Select the Dates tab.
- Scroll to the bottom of the window. Select the checkbox for “For ongoing item calculations […]”. Type a date, or click thecalendaricon to use the date picker.
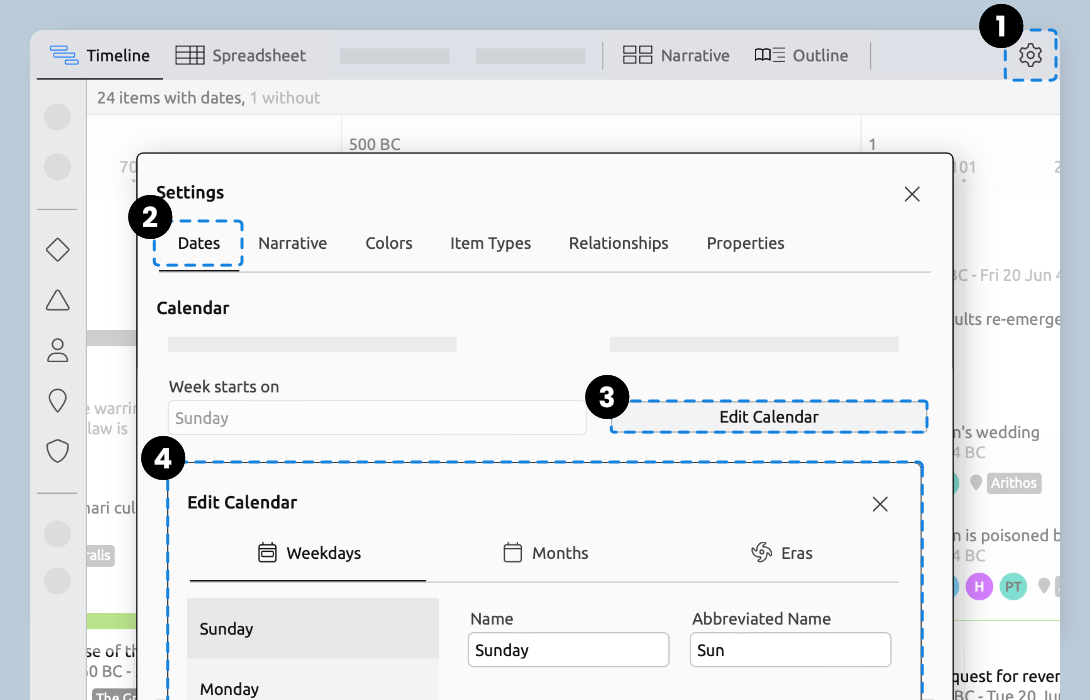
Renaming Days, Months, and Eras
- Click theSettingsicon to open the Settings window.
- Select the Dates tab.
- Click Edit Calendar to open the Calendar window.
- Customize the names of days, months, and eras.
Calendars can’t be fully customized after any dated events have been added. To unlock full editability, create a new timeline and customize the calendar before adding any information. You can then import data from existing timelines via CSV upload.
Try Aeon Timeline free for 14 days
Get Aeon Timeline and easily visualize and organize your project.